
This is the third and final part in my more instructional or guiding blogs series about how I manage my workflow. In today’s blog, we finally take a look at how I manage my workflow once I am home from the shoot and am ready to start editing. It goes a little something like this. So you get home from you day out on a shoot and you have a bunch of images captured sitting on your SD card(s). Now what do you do with them? For me my post processing workflow is fairly consistent regardless of the type of shoot I undertake. And I generally believe that the sooner you get those images off an SD card and onto a hard drive the better. There are some small differences in my processes and I will go through those here again just as I have with Part I and Part II of this blog series.
Importing
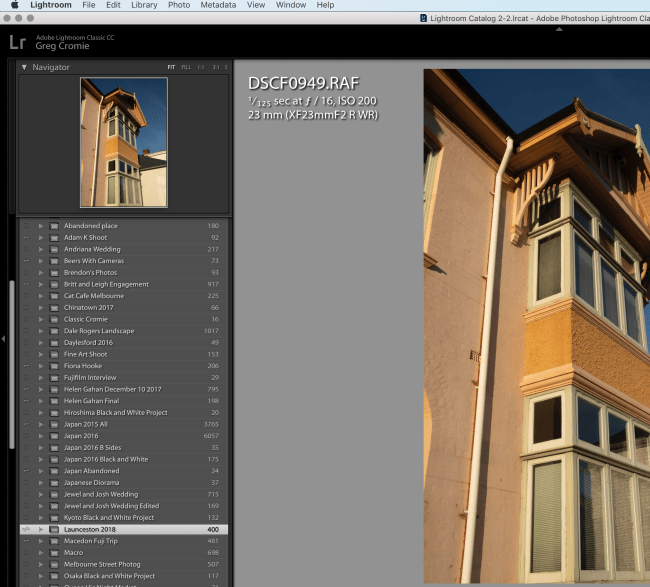
For starters I will import all of the RAW files from the SD card into Lightroom. I make no changes to the files on the import process – as in I don’t apply any presets on mass. Once the import of the files is complete I will move all the photos into relevant Collection folders in Lightroom. For example, the images I shot in Launceston earlier this year were moved into a Collection folder titled Launceston 2018. All of my photographs that are imported via Lightroom are stored on an external Lacie 4Tb Thunderbolt/USB C hard drive. It is fast and effective for both the storing of and accessing images to edit, etc. I also make back-up copies but I will cover that a little later on.
I will use this same process for all of my editing purposes. That way I have a reliable and consistent process I follow that even if interrupted I can pick up where I have left off. So I have already imported all the RAW files into Lightroom and have created a Collection. I will review all of the images in thumbnail view in the Library tab and if there are any that are blank or obviously blurred then I will delete them from storage completely. 4Tb sounds like a lot but it can disappear very quickly. Once I have removed the unnecessary images, I will then review each image one at a time at full screen in the Develop tab. It is at this point that I make a judgement as to if each an image is worthy of an edit and then worthy of use. Worthy to share on social media or to put towards a blog. Or for more important shoots, to be used by the client. Then I undertake the following:
Cropping and aligning the image.
If it is a worthwhile image, then I will first make any necessary adjustments to how the image is framed via the Crop Overlay in Lightroom. This may include aligning the image to ensure that it is straight both vertically and horizontally. I may also choose to crop out aspects of the image. Finally, if I am planing on printing the images, or it is likely that a client will print their images, then I will make sure that the ratio in the Crop Overlay section is 5X7. The reason why I do this is that this is a more native print size that the typical print kiosk will recognise. Otherwise, the kiosk would just crop the image itself and you may lose important details from the total image.

Adding Presets
Next I will apply a preset to the image. When it comes to presets in Lightroom, I have two options that I mostly rely on. The first is the Camera Matching feature under Profile Browser whilst in the Develop tab of Lightroom. This gives me the Fujifilm Colour Film Simulations such as Astia, Classic Chrome, Velvia, etc that I can apply to RAW files to replicate the in camera Film Simulations.
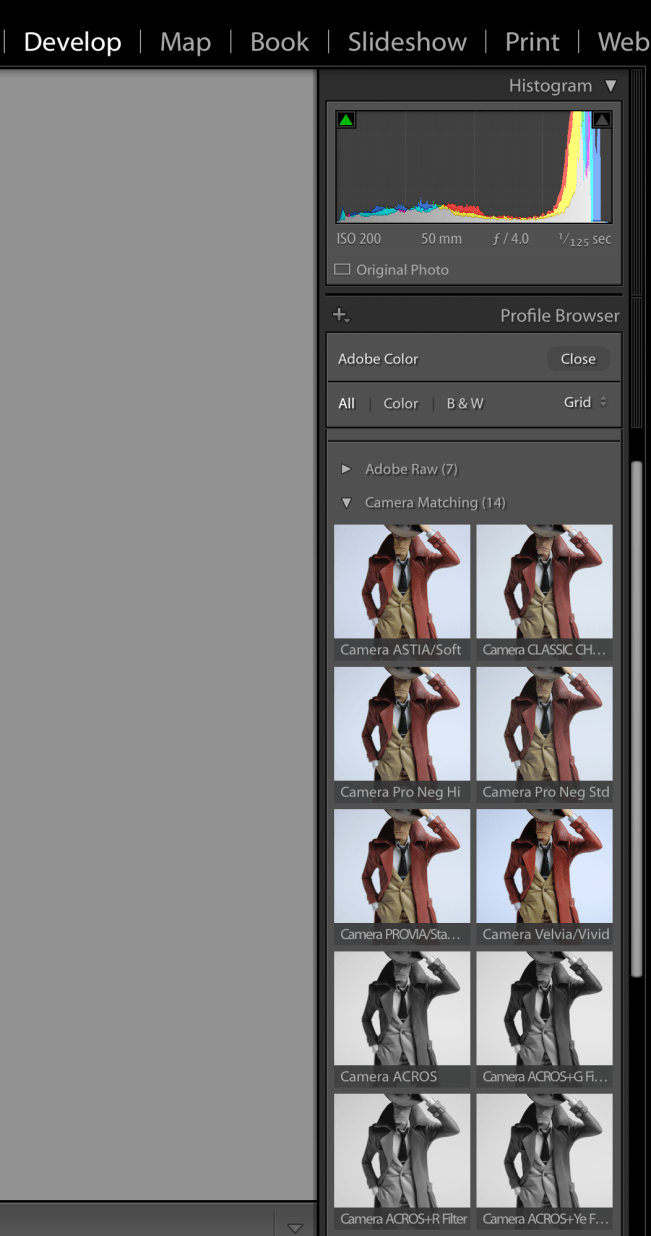
Alternatively, I can apply one of my own Lightroom Presets that I have developed using the Fujifilm Colour Film Simulations as a base level and customised further.

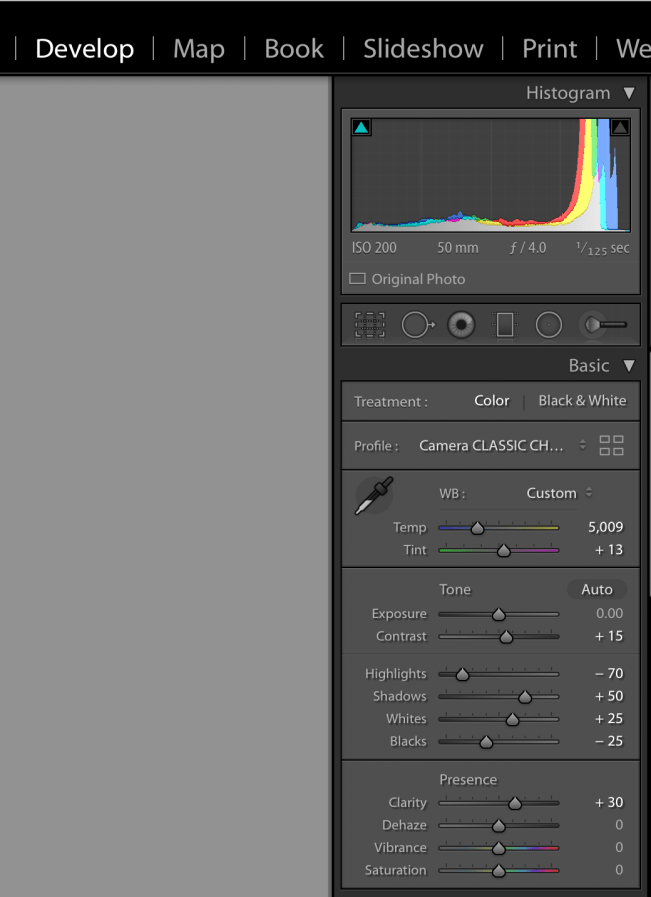
Once satisfied with the mood of the preset, I will then make some alterations to Temperature and Exposure, followed by any minor adjustments to Highlights and Shadows plus any other little tweaks. Creating your own presets in Lightroom is actually quite simple and you can even export them and share them with friends. I may look at writing a blog on how to go about it in the future.
Exporting finished images
Once you have completed making the necessary edits and adjustments to your image or images, you can then export them so they are ready to be used. When exporting images, I will always export to a folder on my desktop and find it much easier to export as a Collection rather than one at a time. Here are some of the key steps I follow when exporting images. Under the File Settings I always save a JPEG with 100% quality.

If exporting images for use on social media or email, under Image Sizing I ensure that the Resize To Fit: box is ticked and that Long Edge is selected. Under that ensure that 1600 Pixels is entered and with a Resolution of 72 Pixels Per Inch. Then under Output Sharpening I choose Sharpen For: Screen and the Amount as High.

If exporting images for print quality, under Image Sizing I ensure that the Resize To Fit: box is NOT ticked and that a Resolution of 300 Pixels Per Inch is entered. Then under Output Sharpening I choose Sharpen For: Matte Paper and the Amount as High.
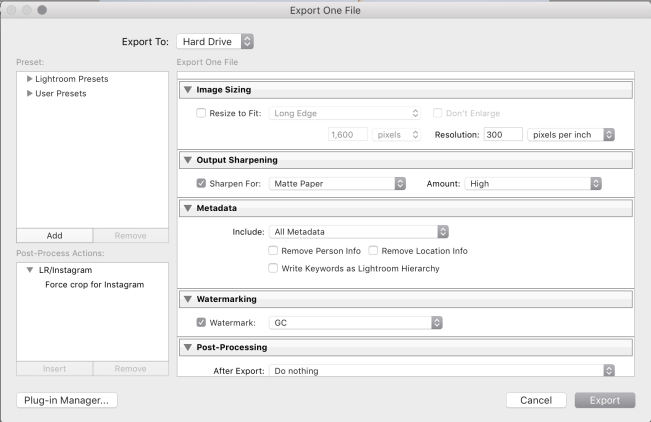
Then you may or may not choose to add a watermark to your image. And then I hit Export and send all the images to that folder on my desktop. If I am providing images to a client for an important shoot, then I will ensure that I export two copies of each image – one set of each image to a folder titled Online Images and the other to a folder tilted Print Images. The exports would each follow the above processes. This way the client has a set of images that they can use to share online or via email and another, much higher quality set of images that they can print and enlarge. For a client, I will drag both sets of images to a USB drive ready for them to use.
Backing up data
As I touched on earlier anything I import into Lightroom goes to my Lacie 4Tb external hard drive. This has a Lightning Bolt / USBC connection so it is pretty fast and doesn’t impact the editing of photos in real-time. So once the RAW files have been successfully imported into Lightroom from the SD card, I initially do not delete or format the content on the SD card until once I have completed the editing process. And even then not before a backup copy of all of those edited images is made. To achieve this, I have a second Lacie 2Tb external drive where I send a copy of the edited files to. So I will have a copy that was sent to my desktop as per my previous explanation and now I have a back up copy on my second drive. This is less important for leisure shooting but gives me greater peace of mind with important shoots. If the folder of images is for a client or say my holiday images, then I may leave them on this drive purely as a back up for some number of months. But it doesn’t end there. I also have a third Lacie external drive that I backup my entire image library to at the end of every month.
That brings us to the end of this three-part series on my workflow. I am by no means a master at Lightroom and what I do know was self-taught. So if you have any handy short cuts or workflow steps that you yourself recommend then please share them in the comments section below. Thanks for staying the distance and happy shooting.

One Response to My photography workflow with Fujifilm X Series – Part III – Post Processing.
Thanks for share this workflow, it’s very useful. And I hope you will write the tips on “how to develop the lightroom presets from the Fujifilm Colour Film Simulations” soon. Thank you 🙂
LikeLiked by 1 person