
In a lot of my blogs I have taken the time and care to photograph items and products that I am using or talking about in that specific blog. When writing about my love of Japanese anime recently I photographed many of the DVD’s in my collection. When I wrote about my use of CURA cleaning products and CURA camera straps, I again took photos of those products. Cameras, lenses and other bits and pieces always feature in my blogs. For me blogs without such images make no sense. Blogs should be such visual experiences for the audience to gain a fuller and richer story.

An early example. Sure it is functional but…meh!
Looking back through my past images of products – and in particular camera gear – my images have been clear and crisp but I still felt that vast improvement was needed. Especially when I look at the images captured by some of my peers in the photographic community. But I don’t have hoards of expensive lighting gear and light stands, etc. In fact, my knowledge of what was needed was very limited. I got in touch with my mate, The Overrated Photographer, and asked for some help. If you check out his blog My Fuji Life, you will see that he can take some amazing product shots. He cannot spell for crap but he knows how to capture the light.
Important notice: All of the behind the scenes images were shot with my iPhone 7 Plus as all of my usual photography equipment was being used. Hence the bad the lighting and white balance of these shots.

The Fujifilm X-T2 and the Fujifilm XF50mmF2. That was all I needed.
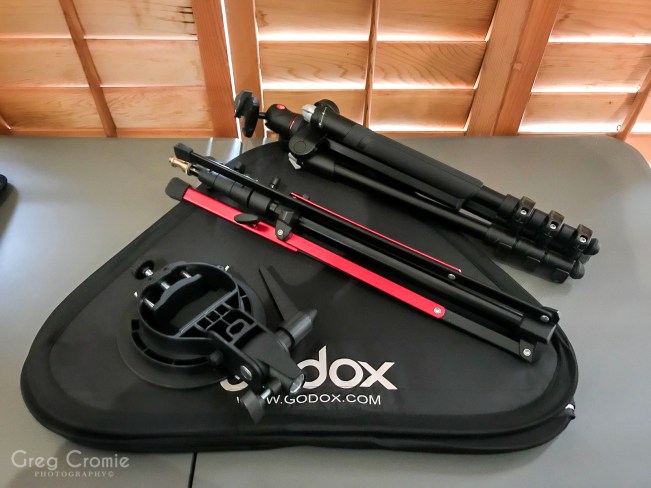
The lighting gear is surprisingly compact.

Your working space does not have to be big. Just enough to fit your gear and your subject.
We caught up during the week and he walked me through a very simple set up procedure to create an interesting backdrop, how to position products for best impact, what lighting options are available and how to mount and place lighting for the desired effect. His wealth of knowledge was exactly what I needed and what’s more is that he is self taught. Good old fashioned trial and error. One of the key things I learned from him was how to utilise focus peak when shooting in Manual Focus. With the Fujifilm X-T2 you must have the front focus dial set to M for Manual. Then in the AF-MF menu scroll to MF ASSIST. Select FOCUS PEAK HIGHLIGHT and you can choose the colour you want areas in focus to highlight. I chose red. This way, when I was setting up for a shot, I would press the AF-L (Auto Focus Lock) button and the sharp in-focus areas would highlight in red. A great way to see what is going to be sharp in the final image. Super cool to know. Afterward we stuffed our faces on Nando’s and talked world politics. A well rounded day.
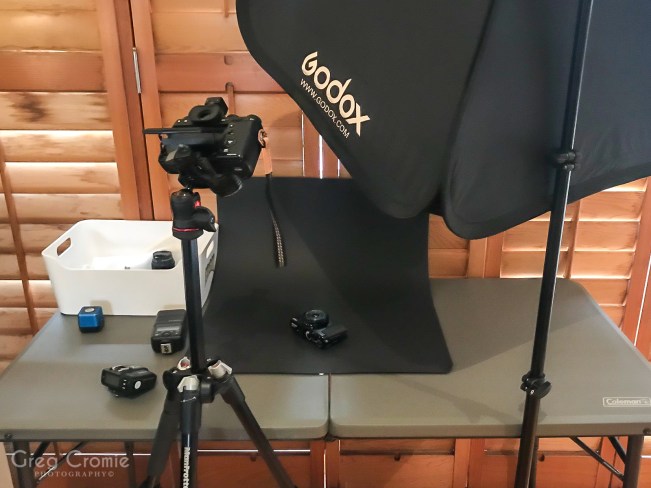
Back at home and flying solo now – apparently my sleeping on his couch was not part of the deal. From this point on my blog will become a little more instructional and a little less romantic comedy! Sorry but that’s the way it has to be. First things first is to set up a space. The Overrated Photographer used his dining table – sweeping weeks of his children’s hard earned crafts and school trophies onto the floor with a disregard that was scary. At home, I set up a folding table in a space that would allow me to set up a tripod and a light stand next to it. I then used an A2 piece of black card and used blu-tac to both fix the front edge to the table and the back edge up against the wall behind the table. This formed a soft curve – as opposed to a hard edge I previously would have created with two separate pieces of card. A word to the wise, be careful not to scratch the card with your gear as it will show up in the final shot and it is hard to hide in post production.

The curve of the cardboard here shows that a softer backdrop can give a better outcome.
To one side I set up a Manfrotto light stand with a Goddox soft box attached. This was a borrowed piece of gear from the ORP (Overrated Photographer). The bracket that comes with the light box has an elbow that is adjustable and lockable. It also has a clamp that allows you to lock in a flash. I angled the soft box down very low and close to the table to get the most light and the shortest shadows if any. I also set up my Manfrotto tripod in front of the table. On top was my Fujifilm X-T2 with the Fujifilm XF50mmF2. You all know my feelings about the Fujifilm X-T2. So lets not dwell on the best camera in the market. And I have raved about the Fujifilm XF50mmF2 lens also. But in this case the 50mm gives a nice level of compression to the final image. Too wide a lens and you have trouble containing the scene within the backdrop.
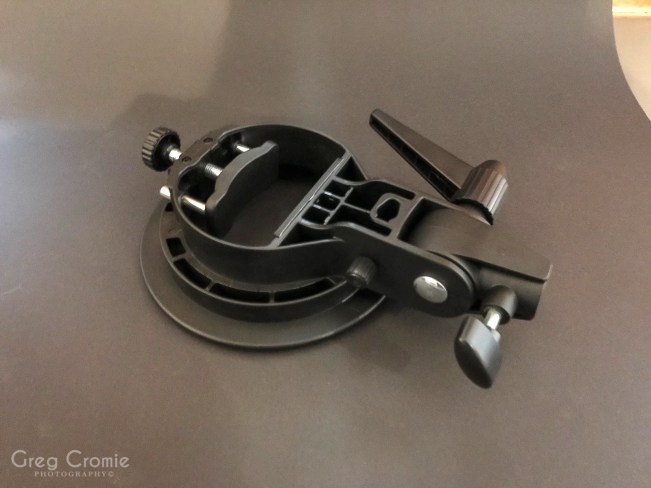
This is the bracket that sits in the back of the soft box. You can adjust the angle and lock it. The clamp in the centre of the circle allows for different size flash models to be used.

Here is the bracket mounted on top of the light stand and also with the soft box attached.

This is the front of the soft box. That white panel diffuses the light evenly.
For this shoot, I actually used two different flash set ups – not at the same time. Just separate tests. The first was another loaner from the ORP. A Goddox X1 trigger sitting in the hot shoe of the Fujifilm X-T2. This was synced to a smaller size Goddox speed light in the TT350. The second set up was my own gear. The Fujifilm EF-X20. This is a tiny little retro flash with both TTL and Manual functions. I like it as it is not an overwhelming flash system. To create a trigger set up, I used the teeny tiny flash cube. One sitting on top of the X-T2 and the other snug under the EF-X20. These flash cubes are a very cool tiny gadget and incredibly affordable, however they will only allow manual settings on the flash. But that is ok for the purposes that I am using a flash for. If you want a more serious set up then go with a trigger and flash like the Goddox ones. I wanted to have success with my little Fujifilm EF-X20 flash as it is all I have at the moment but is a pretty cool little unit.
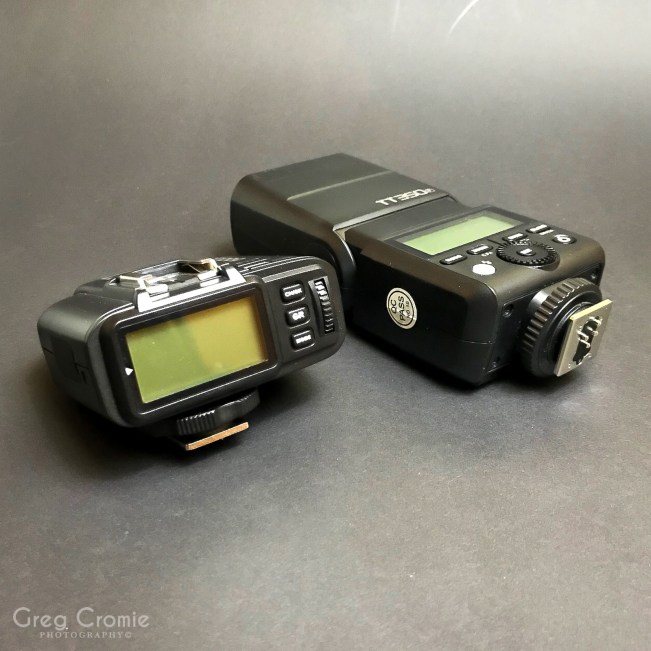
The Goddox X1 trigger and the Goddox TT350. Both items are specifically designed with firmware for Fujifilm cameras.

My ultra minimal Fujifilm EF-X20 flash with both Manual and TTL. Also the Flash Cubes. You can get almost 10 meters range with these.
Then, I placed the test subject on the card. In this case I wanted to photograph my Fujifilm X-70. The next and most important part of this exercise is all about controlling the light and testing various settings. With the Goddox I could shoot TTL (Through The Lens) however preferred to continue to shoot in manual mode. I generally kept the manual at either 0 or plus 1 stops of light. I always kept the ISO on the camera at 200. I may have bumped it to 400 on occasion but the difference is unnoticeable. I wanted to get as many details of the X-70 in focus so I opted for an aperture of between F8 and F16 on the Fujifilm XF50mmF2. The shutter speed was also variable from 2 seconds up to 1/125 – never higher as my manual flash would not sync at high speeds with the flash cubes. A word to the wise, when shooting at such slow speeds, I always opted to use the 2 second delay timer. This way I could set everything up, hit the shutter and remove my hand without risk of shaking the camera.

This is all the tech that I used during this experiment. Also important to note that as I used pretty much all of my gear in taking the actual product shots, that behind the scenes shots like this were taken with my iPhone 7 Plus.
And for the next two hours it was all about changing settings and taking hundreds of shots. Perhaps someone who is a lot more proficient in this style of photography may have some go to settings. But for my first try with this sort of lighting gear the joy was in the experiment and the experience. I would take dozens of shots, pause and plug my SD card into my computer and import the images into Lightroom. Then I would review them and look through the settings and work to replicate or improve. I would occasionally change the height of the tripod to get different angles of the subject. And other times I would adjust the height and angle of the soft box. Again it is all about trial and error to see what works and what does not. I have plenty of under and over exposed images.


The final step for me was cleaning up the images in Lightroom. And by cleaning I mean cleaning. I thought I had brushed and blown away all dust specs from the test subject – Fujifilm X-70. But there were still so many there when I enlarged the image in Lightroom. I used the Spot Removal feature in Lightroom – something I had never used before. But without it, the images were spotted with dust and that was very distracting especially in monochrome. It took away from the dramatic lighting I had worked so hard to achieve. It was tedious but well worth it as it turned my ageing Fujifilm X70 into what looks like a brand new camera. And that is what I was going for. A product shot of the Fujifilm X70 that I could be proud of. Personally I am really pleased with the outcome. And the process turned out to be a fun experiment. A huge thanks is due to the ORP for the loan equipment, for the shared knowledge and what’s more, for his time. I will not thank him however for how he devoured that half a chicken at Nando’s. No one should ever have to witness that. Happy shooting.


4 Responses to Photographing Products – Back to school with the Fujifilm X-T2 and a helping hand.
Reblogged this on My Fuji Life and commented:
This is for you Overrated Photographer…..
LikeLike
It’s useful to play with light and background colors, materials and textures, 👍🏿
LikeLiked by 1 person
Yeah agreed. My friend has some boards with different timber laminate on each side.
LikeLiked by 1 person
[…] also been a contributor to both. Anyway, back to the blog. In a recent blog which you can read here, I took you through a basic step by step process of how I improved my game in taking such shots. […]
LikeLike