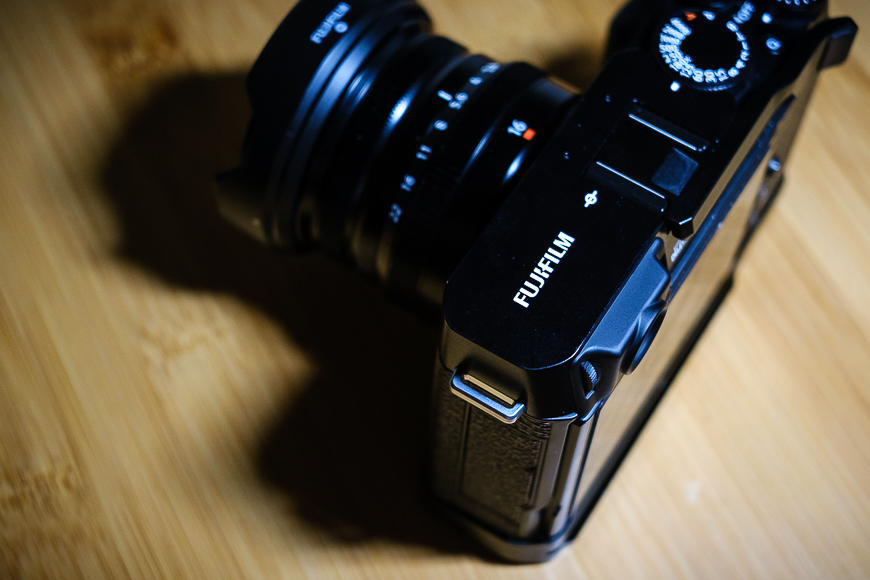
Good morning, and welcome back to my blog, where I talk about my life as a photographer and writer. I’ve been getting out and about lately and have captured thousands of images in the past three months. I’ve shot a range of styles in all sorts of lighting conditions. What’s more, I’ve been out and about with my camera shooting street scenes for me, and I’ve taken a lot of shots dedicated to articles I’m working on for here and for clients. Like most photographers, I employ an end-to-end workflow to review, collect and edit all these images. I’m working with a 2017 iMac (more on that later) and utilise Adobe Lightroom as my primary editing software.

I decided to write about my end-to-end workflow so that others can see how I come up with the final image you see here and on my social media. Those new to photography, or even those that shoot JPEG only, may learn about editing RAW Fujifilm image files in an application like Lightroom. In this article, I’ll go over every step, from taking the SD card out of my camera to exporting edited images from Lightroom. It’s a process that I’m constantly refining and learning from. I learned how to optimise software like Lightroom, and I also learned a lot about photography. Taking the time to review your photos and what camera settings you employed is an excellent teacher.
Importing Images Into Lightroom
This is hardly a fascinating step in the process, but it’s essential. I shoot my photos in RAW format, meaning they have all the image data captured by the image processor. On the other hand, JPEGs have a flatter and limited copy of the data from the sensor. This is why a JPEG image may be 300KB, and a 300KB RAW file could be 3MB. When I return from a shoot, I launch Lightroom, take the SD card from my Fujifilm camera, and plug it into the SD Card Slot on my iMac. When I hit the Import button in LR, my files download to an external 4TB hard drive via a Thunderbolt connection. In LR, I have also selected for the software to not import suspected duplicate images in case I forgot to format my memory card before my shoot. The images now appear in my LR Library tab under the Previous Import folder and are ready for me to review.

Reviewing All Images
In the past, I kept every photo imported into my hard drive. I dealt with smaller file sizes in the early days as the earlier Fujifilm cameras only featured 16 MP image sensors. Today, however, my Fujifilm X-E4 utilises a 26.1Mp CMOS X Trans 4 image sensor. The file sizes are considerably bigger, so I need to be aware of how I store so many images. As a result, when I have my import library before me, I take the necessary time to scan each photo and delete any of the ones I no longer need. If I’ve shot the exact same scenes two or more times, I will likely keep the best and chuck out the rest. Some images have had poor exposure, blurred elements or just a stupid photo of my feet. I still review them to learn and adapt for future outings – but I do it quickly to get to the good stuff.

Crop And Straighten
As I become more experienced and familiar with the lenses I shoot with, I am capturing well-framed and straight images. The more you do something repeatedly, the better you get at it. However, it doesn’t always go to plan, and sometimes, I’ll need to straighten and crop an image. When shooting with my Fujifilm X70, I’m less likely to crop an image in post-production. It still rocks a 16Mp image sensor, so cropping results in a severe loss of image resolution. I might trim the edges a little at best and always straighten the scene. With the Fujifilm X-E4, the images have far greater resolution, so I can be a little less restricted with cropping. I prefer to avoid it as much as possible, as framing and composition should be developed in the field and not on a computer. I recently had the chance to shoot with and review the Fujifilm X100 VI. It packs a 40.2Mp X-Trans CMOS 5 HR sensor that captures stunning detail and image resolution. It was exciting cropping my sample images as much as possible to see their impact on the final image.

Fujifilm Film Simulations
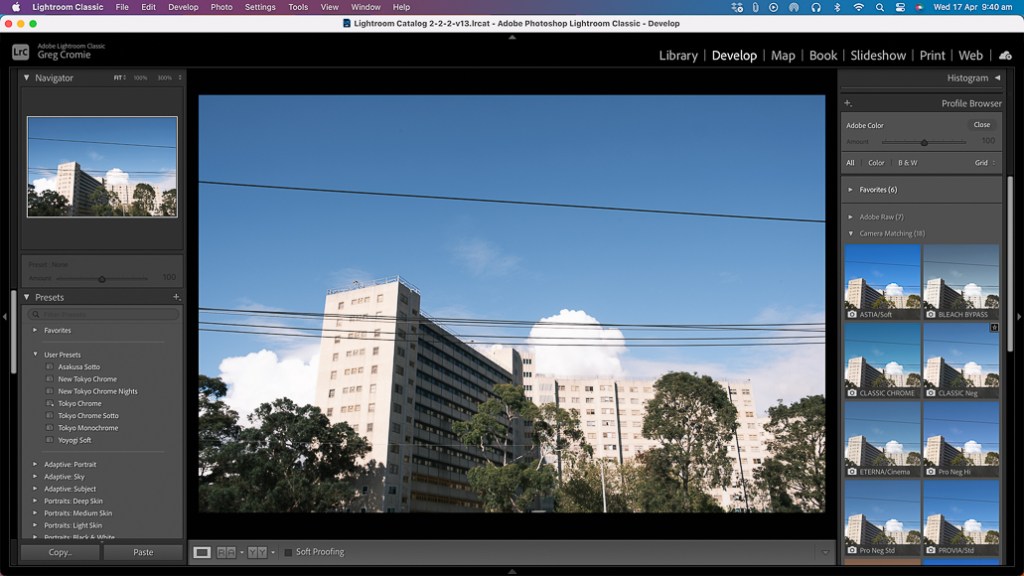
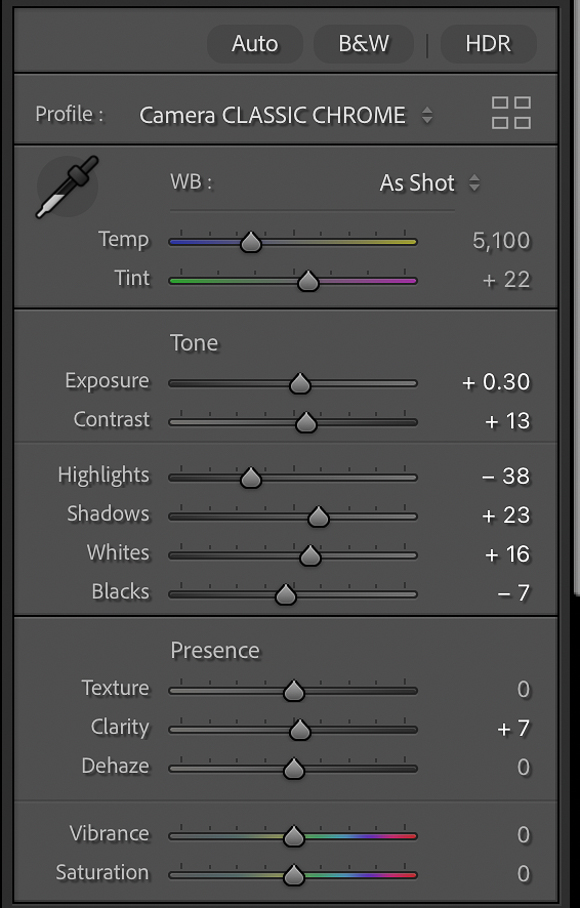
Fujifilm X and GFX cameras all feature a range of Fujifilm Film Simulations. Fujifilm has a long history of creating analog film stock with striking and appealing outcomes. They’ve translated the look and feel of those classic film outcomes to digital film simulations. Film sims are like filters that can be applied to JPEG images shot in the camera. You also have a live view of how the Film Simulations look either via the viewfinder or LCD. Fujifilm RAW files don’t export with the film simulation applied to the file. Fortunately, Lightroom recognises every Fujifilm camera and the film simulations available for that model. Once I’m satisfied with the crop of the image in LR, I decide what Fujifilm film sim to apply to the image. I have a few favorites that are my go-to simulations, however I’m becoming more adventurous and trying out more of the available simulations.
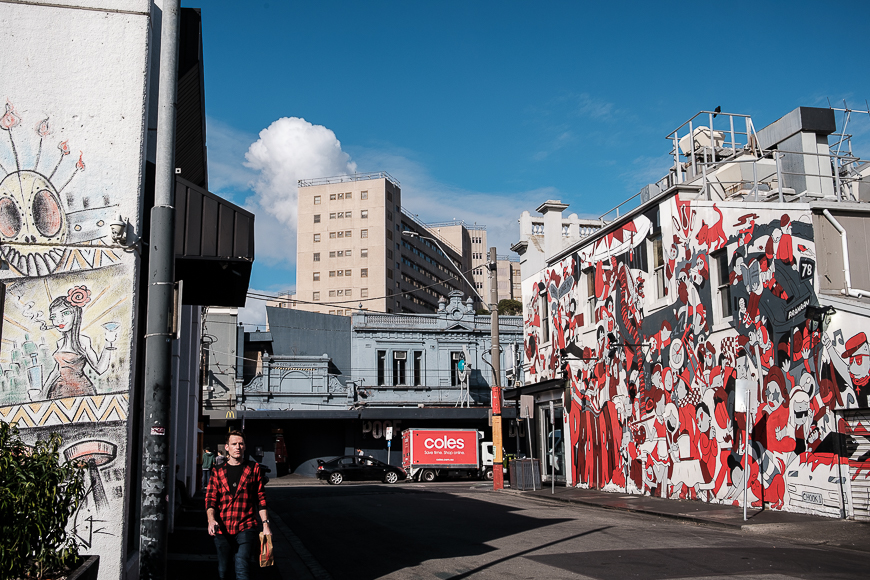
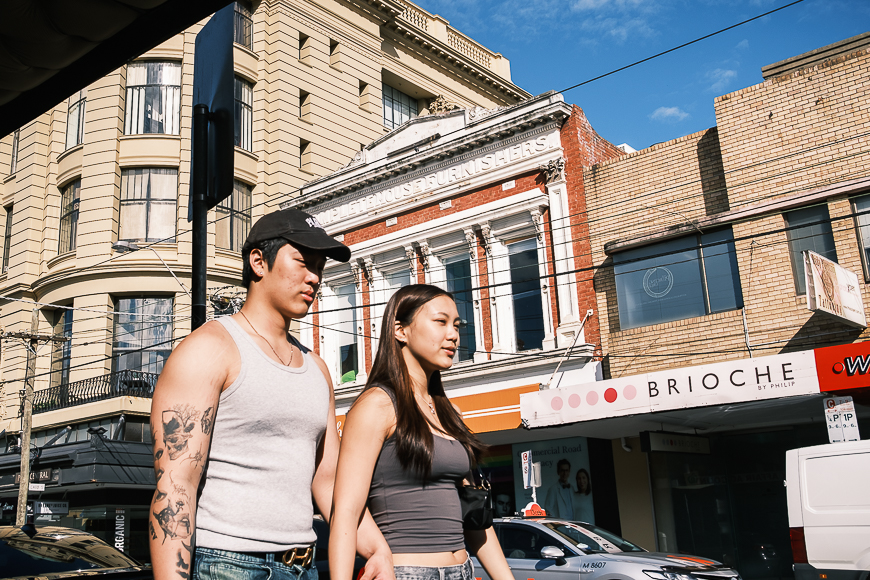
For street photography, I typically apply Classic Chrome. It mutes the colour a little and adds excellent contrast and warmth to images. I’ve been using Classic Negative for street shots more recently, as it is a little greener in hue and more washed out than Classic Chrome. One of my all-time favourite film simulations is the black and white Acros. It delivers a gorgeous tonal value to street and lifestyle images with just the right amount of contrast. I love using the Fujifilm film simulations on my RAW files as I appreciate the cohesion between using a Fujifilm camera and seeing Fujifilm colour science at play.

New Tokyo Chrome
When I returned from one of my Tokyo trips, I edited my photos and utilised Classic Chrome as a film simulation in LR. I noticed that I was making the same adjustments to colour saturation, contrast, shadows, highlights, and more in almost every photo. I thought Lightroom could save custom edits as some sort of profile to apply to other images. But at the time, I had no idea how, as I had only been using LR for a short time. So I researched and got advice from my adorable idiot friend Athol and discovered I could save custom edits as Presets in LR. As a result, I spent ages playing around with the existing Film Simulations in LR and added my own mix to them. I tried not to stray too far from the purity of what Fujifilm had already spent countless years developing.

I’ve had many iterations of LR Presets over the years, and every now and then, I will go back and tweak them just a little. One of my most used was a preset I named Tokyo Chrome. It was based on the original Classic Chrome film simulation; however, I beefed up the contrast and altered some of the colour mixes a little. I applied it to subsequent photos from my Japan trips and loved the simplicity it afforded me in editing photos. Since my recent return to photography, I took the time to review the OG Tokyo Chrome and made some finder adjustments to add warmth and character to photos. I’ve named it New Tokyo Chrome – it’s a homage to my return to photography, my love of street photography in Tokyo, and the Fujifilm Classic Chrome film simulation. I highly recommend that other photographers play around with custom presets in Lightroom or whatever editing software they use.
Minimal Edits Where Possible
Aside from adding film simulations or custom presets, there’s often a need to make minimal edits to the image. I try to work with a light hand as I’ve seen many examples of over-saturated and over-contrasted images. I’ll make the necessary adjustments to Exposure, Contrast, Highlight, Shadows, Sharpness and Noise management depending on the lighting conditions of the photo. I also like to add a bit of a feathered Vignetting to reduce its impact. I think it adds a little depth to flatter images. I prefer not to use masking to push back highlights or open up shadow areas. If I didn’t get it right when I took the photo, I’d learn from it.
Healing Images
On some occasions, I’ll need to use the healing tool in Lightroom to remove dust from the surface of products or sensor spots. Sensor spots occur when you have a dirty sensor with a tiny piece of dust on it. I have a couple at the moment, and they are driving me crazy. I’ve carefully cleaned the image sensor on my X-E4 twice, and still, the spots appear. I thought it might have been dust inside the lens, but the spots were still there when I shot with a different lens. I’ll give it another go before I take my camera in for a professional clean. The LR Healing menu has several options, but I only use the Clone tool. Sensor spots typically appear in areas with a flat colour or tone – such as a blue cloudless sky. The Clone tool allows you to select a spot on your image, and LR will then automatically select what it thinks is the best spot to clone a clean spot from. You can move the clone spot to a better area if needed. LR then replaces the dirty spot with a clean clone spot.

I also use the Healing/Clone tool when I shoot product shots for articles I’m writing. If I photograph a lens or camera body, I take the time to clean it as best I can before it is up for the product shot. However, black cameras and lenses show up even the tiniest spec of dust that’s fallen on them. When you look at the image in LR, the specs of dust and hair show up like stars in the night sky. It’s not a good look for product shots, so I will take the time to clone them out. I have to zoom in on each area of the image to clone dust specs and ensure that the picture looks clean. The good thing about the LR automatic process is that even if you have a spot on the edge of a sharp line, it will look for a clean clone with similar attributes.

My Set Up
As mentioned, I’m using a 2017 iMac for my workflow management. It’s getting on in age, and while it does a pretty good job of keeping up with my work, it’s slowing down and sometimes just freezes mid-action. My iMac runs a 3.4GHz Quad-Core Intel Core i5 processor, a Radeon Pro 560 4GB graphics card, and 16GB 2400MHz DDR4 RAM. The iMac runs the latest MacOS Ventura operating system and houses 250GB of hard drive storage. I don’t store my photos on the iMac as I have two 4TB Lacie external hard drives. They’re both connected to the iMac via Thunderbolt and are fast enough for my workflow. I also love that my iMac has a standard SD card slot for easy file transfer. I would like to upgrade to a new iMac, but that’s a financial commitment I can’t afford now. If I had the money, I would grab the new 24″ iMac with the M3 chip. Regarding specs, the entry-level model features an 8 Core CPU, 8 Core GPU, and 256GB of SSD storage. I would still rely on external storage and upgrade that to SSD. The only other change I would make is to bump the RAM from the standard 8GB to 16GB just to future-proof it a little – if I had the extra money. I did that with this 2017 model iMac when I ordered it from Apple. The base model is $2,200 AUD but only comes with 2 Thunderbolt/USB 4 ports. It’s another $300 to jump to the mid-level iMac with a 10 Core GPU and 4 ports. What do organs sell for these days?

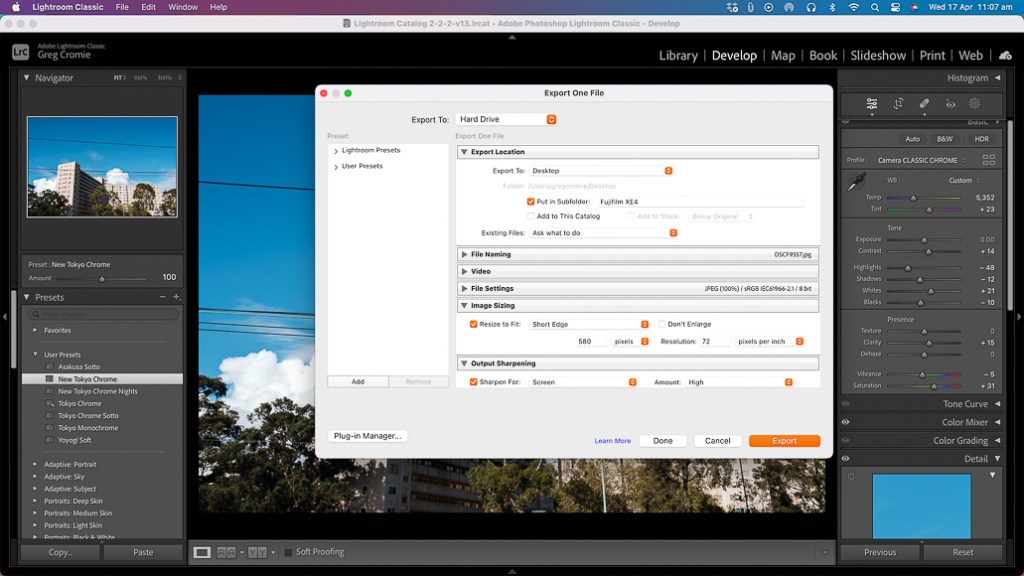
Export and Use
The final step in my workflow process is to export the images and put them to use. Depending on the use of the photos, I will adjust the image quality and resolution to suit. Some clients have particular dimension requirements for their sites. For my own purposes, I typically resize my images to fit 580 pixels on the long edge at 72 pixels per inch resolution. The file sizes are small enough for email and social media posting. I will adjust the sizing and resolution to deliver higher-quality images if the photos are for a client that wants to print. I’ve been sharing more of my pictures on my social media lately. I will post a few photos each day with a short description, the camera and lens model, and the film simulation applied in LR. I no longer use a watermark on my photos because it is unnecessary.
Final Thoughts On My Workflow
That’s pretty much all there is to my post-processing workflow. The only other things I do after each editing session is return the SD card to the camera, format the card, and plug the camera in for charging. Once charged, I’ll return all my camera gear to my bag to keep it safe and clean for the next outing. A photography workflow can be whatever you want to make of it – mine is just one example. I know plenty of photographers who spend twice as much time as me editing photos. Others who can’t stand the editing process prefer to rely on their capabilities with the camera to capture correctly framed and exposed shots. There’s a great temptation in that approach: you spend far more time being out and about with your camera than being stuck in front of a screen.
Other photographers edit their images on an iPhone or iPad with Lightroom for Mobile. Some even use the Fujifilm in-camera RAW conversion menu to apply film simulations and minor edits to their RAW files in the camera and then convert them to JPEG files. It all comes down to personal choice and if you have the resources to afford a Lightroom subscription and suitable computer. I hope that this article has been of some benefit to someone out there. If you have question then please feel free to ask them in the comments below. Above all else, get out and shoot and worry about the editing process later. Just enjoy the moment.

3 Responses to My Current Lightroom Workflow
Hi Greg thanks for this , very helpful.I have one annoying thing with LR. I
LikeLike
Thanks for sharing the workflow in such detail! You’re inspiring me to write my own blog post on this one of these days… adding it to my list of blog ideas!
LikeLike
[…] for the iMac, I mentioned in my last blog – My Current Lightroom Workflow – that my 2017 iMac is running slow. This is especially evident when using Lightroom and […]
LikeLike