Hi and welcome to my latest blog series where I document and explore my return to photography. If you’re new to this series, let me catch you up a little. I had to take a two year break from photography, writing, and pretty much life due to poor health. Now, I’m delighted to say I’m much better and in a great place to rediscover my love of all things photography. For those of you that have been reading along, in my last entry, Rediscovering The Light – Hunting Light, I discussed my process for following the fall of light and shadow throughout the day. I’ve learnt that having an internal sundial is an essential skill for any photographer to develop.

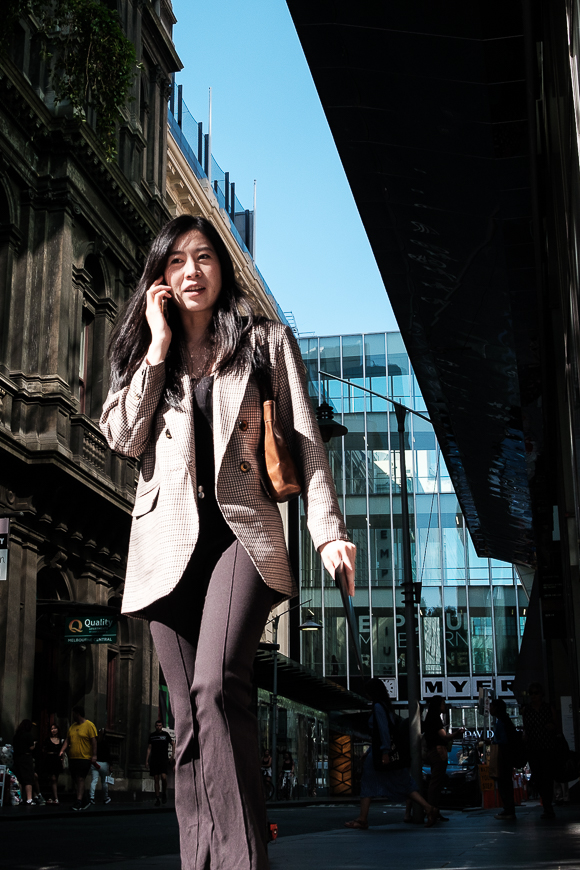
I’ve often talked about my view that photography is defined as capturing light and time in a precise moment and place. A moment that’s never to be repeated and a place constantly in flux. The scenery, environment, weather, and casting of light and shadow will never be exactly the same. It’s a big part of my street photography philosophy too. I believe that street photography is documenting how people interact with the world around them. It’s unscripted, and as a result, that moment in time will never take place again. It’s why I do what I do and also why I love it. In many ways, photographers are historians and have an important role in social documentation.
Exposure Triangle
In my previous blog I discussed my methods to see, build, and capture a composition. Today, I want to talk about the actual camera settings I use to control the available time and light. Another way that many photography educators look at it is to describe the Exposure Triangle. The exposure triangle is a handy little infographic to help photographers understand the three core elements of exposure. Shutter speed, ISO, and Aperture are the principal elements required to master effective image capture. However, the three elements don’t operate in isolation – they each have an impact on one another. For example, you can have the right ISO dialed in for the available light, and an F8 aperture to capture everything in focus, but as soon as you change the shutter speed the frame can go too dark or blown out with brightness. Go too high with ISO and you get too much grain and pixel loss. Go too low with shutter speed and your images become blurred.

Understanding the exposure triangle is a fundamental lesson in photography. I’ve written a number of educational articles for various sites about the Exposure Triangle. Here’s one I wrote a couple of years back for Shotkit.com. However, the best way to master it is to get out and shoot with a camera and utilise the manual controls. Theory helps but practice is how to master.

My Camera Settings
Street photography is a fast moving game and you often have to see the shot, frame the composition, and take it within a heartbeat. As a result, I tend to be changing my camera settings almost after every shot I take. I want to use this article to break down how I set up my camera and what exposure settings I dial in for street photography. And, while these settings mostly apply to street photography, the practice of constantly assessing the light, motion, and changing camera settings applies to every genre I shoot. Practice, learning from past shoots, evaluating the settings and outcomes when I edit, and patience, all support making this skill second nature.

ISO
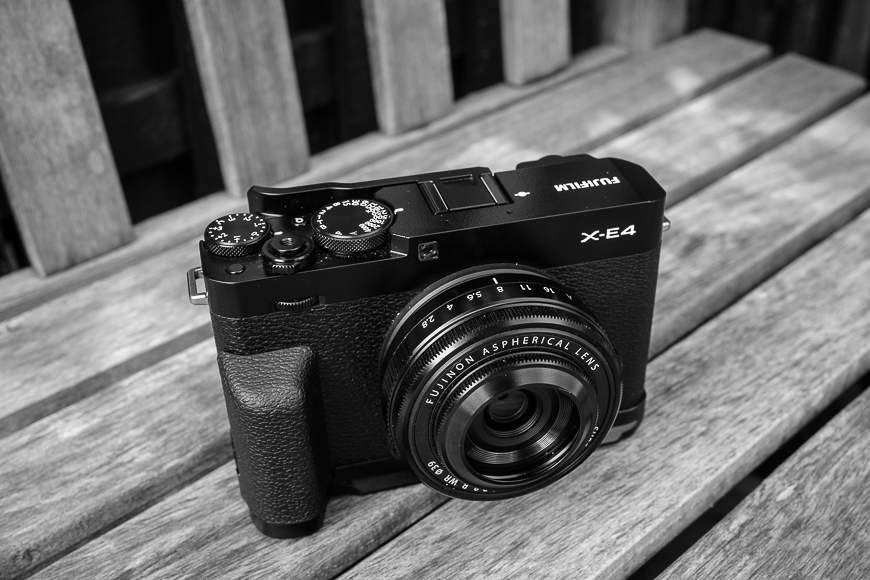
When I head out the door, the first thing I do is evaluate the quality and quantity of the light. If it’s bright, cloudless, and super sunny, I will dial in my ISO at 200. If I’m shooting in extreme brightness I will drop it to 100 depending on the situation. However, if it’s cloudy, stormy, or after sunset, I will set ISO between 400 and 800. If I’m shooting before dusk, then I’ll crank the ISO to 1600 – this is pretty rare though. One of the elements I love the most about the Fujifilm cameras is the manual control dials located on the Fujifilm camera bodies and lenses. While my Fujifilm X70 doesn’t feature a dedicated ISO dial, I set the manual focus ring to act as an ISO dial. As for my Fujifilm X-E4, I have set the rear command dial to control ISO. In both cases, I can quickly adjust ISO without having to look down at the dials or dive into a menu system.

Aperture
As for aperture, all of my Fujifilm lenses feature a manual aperture ring on the lens. The full f-stops are marked clearly and each 1/3 stop has a small click when turning the dial. Once again, I don’t even have to look at the lens or rely on an auto-aperture setup to get the right exposure. For my street photography work, I will almost always set my aperture at F8. F8 is a nice mid-aperture settings that allows for everything in frame to be in focus. Whilst it’s a bit of a set-and-forget option, it allows me to focus more on the ISO and shutter speed. However, from time to time, I’ll manually adjust aperture to suit an extremely low or high light situation. In other genres, I opt for a wider aperture of F2 or F2.8 to achieve depth of field, subject separation, and background blur. When I’m out and about and shooting as I walk, F8 gives me confidence that all elements of the composition will be sharp and in focus.

Shutter Speed
For street photography, I need to set a relatively fast shutter speed as the subjects are on the move. They may be travelling toward or away from me at a varying pace. In other situations, I will also be on the move as I stroll along streets. I can turn a corner and the perfect composition is about to unfold. I need to raise my camera, frame the composition, achieve focus, and take the shot. That’s a lot of motion. A slow shutter speed may be better for low light situations, but there’s no point capturing better light if everything is blurry. I tend to set my shutter speed between 1/250 and 1/500. That way everything is frozen in time – that moment is preserved. If the light is particularly high, or I’m including faster moving objects such as bicycles, I work at 1/1000 shutter speed. The flip side is where I might want a little motion blur to demonstrate momentum in the composition. I slow the shutter down to 1/125 or 1/60. Anything lower than that and I get a little shaky trying to grab a stable shot.

Focus
I’ve very rarely used manual focus in my photography exploits. It’s not that I’m lazy – I set everything else manually after all. I just prefer to rely on the camera focus system to lock on to the subject perfectly. Fujifilm have nailed their autofocus performance and it gets better with each new generation of camera. I also want to point out that with street photography, I don’t use tracking autofocus to recognise the subject and stay on them. Street photography often involves many people in the foreground and background. Therefore, I use either single point or zone focus to select the most important element within the composition. If time permits, I use the camera’s toggle to move the focus point to where I want the subject to land. That way, if I am shooting with a wider aperture, I know that my key subject is crisp.
Everything Else
To be honest, there is nothing else that I adjust when shooting street photography. Modern cameras, including Fujifilm, have lots of bells and whistles to elevate the shooting experience and creative expression. The settings that I’ve outlined above are the whole of my input control. I like to keep it very simple and focus more on the joy of the experience than fiddling in menus. Besides, given I manually juggle ISO, Aperture, and Shutter Speed, I’ve got enough to do. And to be honest, I don’t see the need for anything else. I don’t use exposure bracketing, high-frame burst modes, eye-tracking, or the video functionality of my cameras.

My goal is to stick to the brief I have set myself – document how people interact in their world at that moment in time and space. I take no steps to fudge the results nor apply the countless ‘cheats’ that a modern digital camera offers. If I take the shot, and it’s blown out, then I’ve missed that opportunity and I review and learn for the next time. If I come home from a shoot and review all of my images to discover that they are all blurry, so be it. Next time, I’ll be more diligent about shooting with a higher shutter speed and manage light more effectively with ISO and Aperture.
Final Thoughts
For me, photography is about controlling time and light. In the early days of large format film photography, when cameras were made from timber boxes, photographers would count the seconds out loud before replacing the cap over the lens to stop the exposure. The same applied when I was developing images in the dark room at art school. We were constantly referring to set times for each stage and controlling how much light was used to expose an image. It’s the core essence of photography and it always will be.

No matter how fancy cameras become, the basic elements of time and light will exist. If you’re new to photography, it’s important to become familiar with this and how the exposure triangle impacts the process. By far the best way to learn is to turn off all the Auto commands and run naked with manual controls. Don’t literally run naked as that’s illegal – just figuratively. Happy shooting. G


One Response to Rediscovering The Light – Controlling Time and Light
[…] my article Rediscovering The Light – Controlling Time and Light, I cover my approach with camera settings and the all-important exposure triangle. Understanding […]
LikeLike