Setting up a home office or studio is a highly personalised process. And, just like furnishing any other room in the house, you want it to be functional, comfortable and an achievable outcome. And by achievable, I am referring to cost, time, and your ability to make something work.
In my early 20s, I studied industrial design, and a big chunk of that education was furniture design and manufacture. I made some pieces of furniture that I was thrilled with – a couple of chairs, coffee tables and also a CD stand (who remembers CDs?). But I always had the benefit of being able to use the workshop at the university. The school had every imaginable hand tool, power tool and shop equipment. The right tools made the manufacturing process much more manageable.

Now, however, I only have a limited amount of tools most suited to home upkeep. The only power drill I own now is a drill. So when I get the urge to design and then build something, it is always cut short by the knowledge that I cannot possibly make it the way I want. And for a long time, I have wanted a work table that I can use for various projects but most importantly, for my photography. Granted I can buy a piece of furniture from Ikea, but they are never quite what I want, and there is no satisfaction in it being just like everyone else. I wanted to make a personalised piece of equipment that would suit my needs and meet that home studio brief – functional, comfortable and achievable.

Long story short, I wanted a single shelving unit that was open-sided with wheels so I could move it around the house and out of the way. The wheels had to be large enough to roll inside and outside on my decking. The decking area is just outside my home-studio space so I can work outside to gain natural light. It had to be rigid and not wobbly like a lot of off the shelf furniture. It also needed to be strong enough to hold my photography gear while making it quickly accessible. I wanted it to be at a height that I could work standing up – this makes it easier for setting up product shots and working at natural standing height. Otherwise bending over all the time at a standard height desk is problematic.
Knowing my limitations with what I could realistically build, I spent a bit of time online looking at shelving units. Most of them were trash-build systems that had no integrity should I put castors on them. I found a shelving system at Bunnings Warehouse – a local Australian chain of hardware stores.

I chose to go with the RackIt system as they are heavy duty so will not be wobbly. The RackIt shelving comes in 400kg and 1000kg variants with the latter being far too big for home use. The steel frame uses a component system so you can build a tall shelving system or a shorter one like I used. The chassis and shelf supports have pre-stamped interlocking tabs that allow you to slot everything together. I was able to test this in-store and have the desired shelving system I wanted to put together within minutes. I could ensure it was suitable and the right size before I even purchased it. When it came to the shelving unit, there was no need for ANY tools. Regardless the unit was secure and not wobbly at all.

I chose to go with a system that had two end frames that are 900mm x 430mm. The cross beams that support the shelves are 900mm in length, and six of these allowed me to create three shelves. I opted for the pre-cut MDF as my shelving surface, and these were 900mm x 400mm and slotted neatly into the frame with additional cross-supports underneath them. It only took 15 minutes to assemble the structure, and the MDF shelves sit free without any fixtures.

I also purchased four castors that swivelled 360 degrees, and each had a lock that activates with a push of your foot. I picked up some quality washers, nuts and bolts and bolted the castors to the existing hole in the base of the steel frame. All I needed for these was a shifting wrench to lock them down tight. These only took another fifteen minutes to instal. The final step of the process was to attach the two large RackIT hooks onto the frame – these slotted into the same pre-stamped locking tabs.

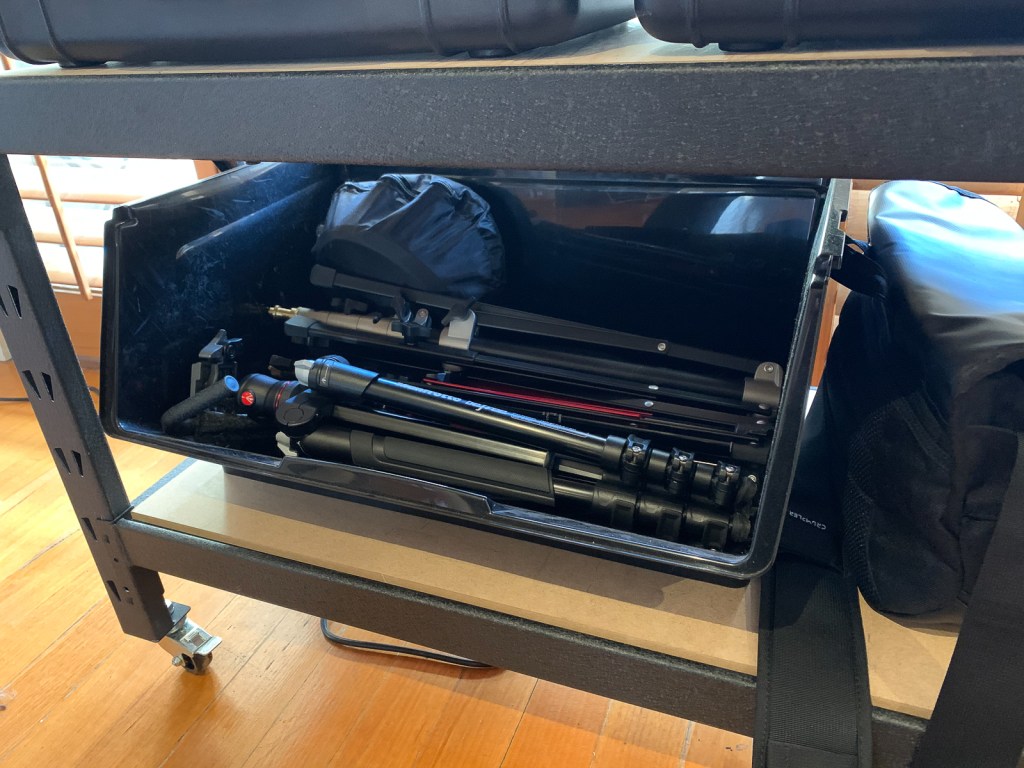
A couple of other additions to the unit include a power board that has four 240 volt sockets and two USB sockets. I used the 3M velcro tabs that have adhesive tape on the back to secure this underneath the top shelf, so it is both accessible and out of the way. The cord for this snakes down the inside of the unit’s leg and secures with cable ties. I bought an LED desk lamp from OfficeWorks – it has cool and warm light settings with adjustable brightness. The light sits on the top shelf and also has a USB outlet in the base. It is perfect for doing fiddly work with a bright light. Finally, I bought an open-sided tub that is wide enough to hold tripods and light stands.
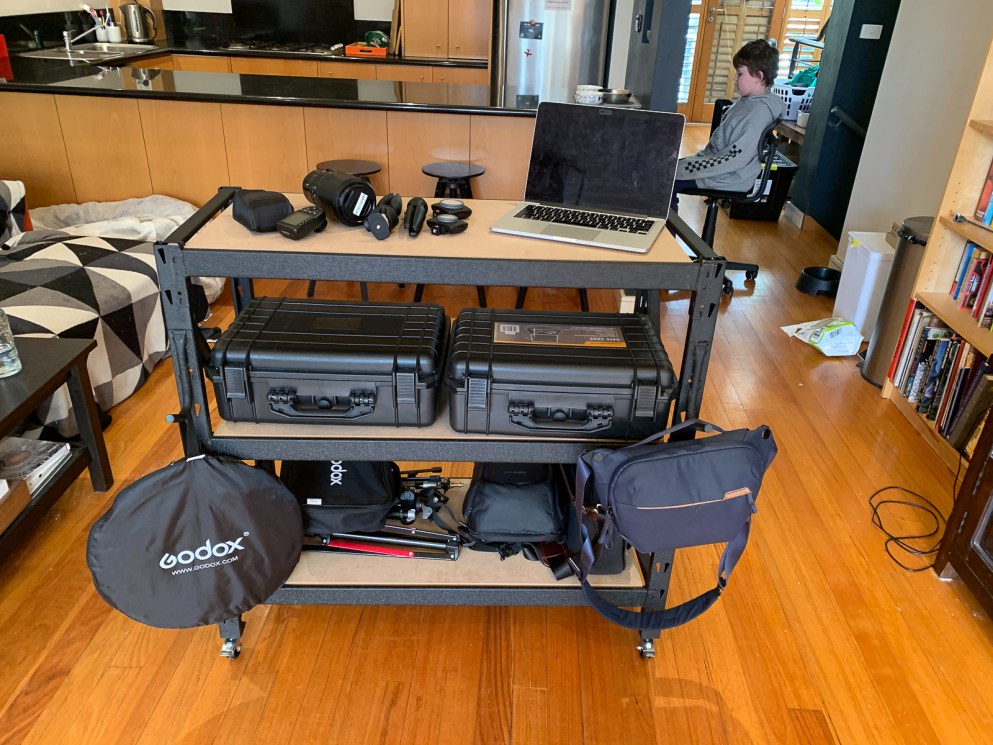
The finished shelving unit is 930mm wide by 1000mm long and, including castors, stands at 970mm tall – I find this is a perfect height for stand up working. I can even comfortably use my laptop at this height without any discomfort of awkward posture. It is also great for doing product shots as I can set up the products and place light stands and a tripod at the required heigh. To maximise my workspace, I have a solid timber desktop that is 600mm wide x 1200mm long and 20mm thick. I can sit this on top of the shelving unit to have a larger workspace – the timber desktop is a hardwood, is heavy and won’t slip off anytime soon. I can add and remove this at will depending on the work I am doing.

Overall, the shelving unit looks great and matches the design choices I have made form my home-studio space. I have a desk for my computer that has black legs and a bamboo desktop. I also have a black Ikea cabinet for storing all my work stuff. So the black frame and wood-colour of the new shelving unit fit in nicely. I can move the unit around the space, which is also a part of our overall living area. And thanks to having timber floors it rolls easily and can quickly be moved out of the way.

To provide a little bit of context, I have put together a list of the products I bought and the cost. All up it came to $148.80AUD – much cheaper than most high end work desks. Plus, I got to build it and customise it myself :
-RackIT Shelving Upright 900x430mm x 2 ($17.50 each)
-RackIT Beam 900x500mm x 6 ($7.60 each)
-RackIT MDF Shelves 900x400mm x 3 ($6.00 each)
-RackIT Shelving Supports 400mm x 6 ($2.30 each)
-RackIT Hook x 2 ($3.30 each)
-Wheels – Castor Bolt Hole Swivel Break x 4 ($4.50 each)
-M10 Bolts and Nuts Pack of 4 ($10.20)
-M10 Washer x 4 ($0.40)
Total cost: $148.80

I also undertook a side project to complement the new shelving unit. If you are into photography, you are probably aware of Pelican cases for storing and carrying camera gear. These are made of high-density plastic and have a foam insert. They have a carry handle and two locks that, along with a full o-ring, lock the case, so it is waterproof. They sound great but cost a fortune. While I was at Bunnings, I picked up two Craftright storage cases that have pretty much the same design but at a fraction of the cost. You can pluck out the foam insert 10mm x 10mm sections one at a time or in bigger chunks. This way, you create an inlay for your camera gear to sit neatly. Each case is 465 x 360 x 175mm in size and only cost $53. The same size in the Pelican brand would cost $300-$400. Bargain!

I use one of the cases to store my cameras and lenses and the other to store my lighting gear. This way, when I am working on a project at home, I can pull the cases out and have my gear all neatly laid out ready for use. The two cases fit perfectly side by side on the middle shelf of the new storage unit. In total, with the cost of the shelving unit, the two storage cases, power board, power cord and storage tub, the project cost around $300. What’s more, I was able to do it all myself, and the satisfaction from that was priceless. Now I have a customised storage and work solution that perfectly meets my needs.

I hope that this has been of some help and even greater inspiration for those of you that want to undertake a project. If you have the skills and suitable tools, you could just as easily make a similar system out of the timber of your choice. You could customise it even further to meet your specific needs.

3 Responses to Building A Workstation and Storage For My Home Studio – May 2020
The case idea is great and you save a lot.
LikeLiked by 1 person
[…] for 2020. If you want a better understanding of how I take care of my gear storage at home, then check out this blog here. It covers a recent upgrade I made to my home studio and gear storage. I hope that you have found […]
LikeLike
Perfect Greg! What an informative and detailed post!
LikeLike